Friday, 27 May 2011

Expecting the Inevitable - Part A

Water

Amongst many things, the Scouting Movement is associated with the expression “Be prepared”.  A more classical interpretation might be “Forewarned is Forearmed” but both apply perfectly when it comes to property maintenance.  Having a building problem is not a case of If it happens but rather When, for it is inevitable.  To save time and unnecessary trouble a good start is to know the answers to these basic but rather crucial questions:
-  Where is the water meter located and how do I turn off the water.
-  Where is the gas meter and how does it shut off?
-  Where is my switch board and which switch shuts off the power? (try saying that three times).

These questions will sound simplistic to many but it’s surprising just how few owners and tenants know the answers.  Problems are not always going to arrive during business hours so be prepared in the event things go array at an awkward hour.  A common maintenance issue is the dripping tap and whether your tap is older styled or the more recent single flick-mix variety, turning the water off is the same.  If you live in a house, the water meter is generally located just inside the front boundary and usually to the left or right (often covered by vegetation).  Sometimes the meters have a loose cast iron cover which gives access to the metering dial and large tap handle.  Turning the tap fully clockwise shuts off the water to the premises and should halt any major leak until a repair can be affected.  Turning the meter fully off will stop all water both cold and hot.


Typical property water meters, one exposed and the other overgrown. Turning the tap fully closed will shut off the water flow to the premises but expect a minute or two for existing water to drain from the pipes.
For those in apartments or flats, individual turn off points vary.  Older blocks will typically have them (hopefully labelled) running along the lower sections of the side or rear outer walls.  Newer blocks will have them neatly displayed behind access panels in the buildings interior.  If you cannot find yours please ask, as it really is important to know.  I once received a phone call in the early hours of the morning from a frantic but apologetic tenant.  Their bathroom tap had dramatically broken off in the middle of the night and despite shutting off a meter, water was still pouring into the Bathroom and out onto the carpeted floor.  I applauded the tenants for their efforts, at least they tried but in their panic and unfamiliarity they had actually turned off their gas meter.

An older style block of flats with pipes leading to one of the upper apartments.  The tap on the left is the main water feed whilst the red handle stops the feed to the hot water unit.  Each block differs so get to know yours.  
If you live in a newer building or one with recent plumbing, you may not even have to venture outside.  Individual turn-off taps are such a sensible idea and will save you much aggravation when problems arise.  If these are fitted they can be shut off quickly and will halt water to the specific tap making it easy to replace a washer or indeed an entire tap without affecting the water flow elsewhere.

Hot and cold shut off valves beneath a Bathroom basin; turn clockwise to shut off.  If you have these, changing washers is a simple task.  Note that HOT taps are always on the left or at least should be.  In France the left hot tap can be confusingly labelled with a C but this actually stands for Chaud which is French for Hot.
An older styled toilet feed pipe.  Turning off the feed to the toilet cistern will halt noisy or running toilets until a repair can be affected.  Good to know if your toilet suddenly goes haywire.
Shut off valves act just like taps and are commonly used with flexible metal- sheathed hoses.  Don’t be scared of these, they are designed to be used, clockwise to turn off, anticlockwise to open.   If your problem only relates to the hot water in your premises you can always turn off the tap at the unit itself, this will stop all flow of the hot water but still allow cold water taps to operate.  This can be extremely useful if the repair is going to take some time or the hot water unit is readily accessible such as in a kitchen or laundry.  Most units however will be located outside or within the ceiling.


Scouting Badge
Please get to know where your meters and turn-offs are located and don’t wait for that crisis to catch you unaware.  Oh! can I also suggest you don’t leave the taps permanently turned on at your washing machine or at least turn them on and off occasionally to check they are operational.  I knew of a long-term tenant who disconnected the washing machine on moving day only to find the washers themselves had disintegrated within the tap.  The taps had been left permanently on for a couple of years and the plastic had long since dissolved without anyone knowing.  Yes, you guessed it, without a washer the tap couldn’t be turned off and the washing machine had to be reconnected until someone could find the turn off valve for the apartment (took quite some time).  I’d also recommend not leaving your washing machine in mid cycle when you go out.   Old hoses do burst and running water can give a frighteningly, literal meaning to the term floating floors.

 Lastly, use good metal washers, find that turn off valve and BE PREPARED.

Juliette Gordon Low, founder of American Girl Guides movement presenting an Order of Merit.  Anonymous circa 1918.
Domesticity in the Bush?  From Lord Baden-Powell's 'Scouting for Boys - Boys' Edition' 1953. 

Tuesday, 3 May 2011

Considering Timber Windows

High on my list of regular requests are problems with windows and after dealing with quite a number this week I felt a small piece outlining their problems and solutions may be in order; I’ll also throw in a little history.  Whilst the focus is on timber, the points made here can be readily applied to both steel and aluminium and covers all styles.

Overwhelmingly, window problems are preventable and due in the majority of cases to one thing - poor maintenance.  I cannot stress this enough to owners and tenants alike and I will repeat here what I regularly say to all with window problems.  The key to sound and functioning windows is down to two words of one syllable each, if you have windows ‘USE THEM’.

Too simple you say?  

Trust me I know what I’m talking about because I see the same problems almost every week and am called in to fix what was easily preventable.  How many of you open your widows on a regular basis?  Do you have a room where the windows are never used?  Certainly you do, we all do and that is the problem.  A window sash is simply any timber or metal framed moving glass panel.  Whether the window is a traditional vertical lifting sash, a side hinged casement or a top hinged awning variety,   excessive moisture retention leads to serious  consequences.  I’ll save my attitudes to our growing obsession with air conditioning for another time but consider this, if the inside temperature is vastly different to the outside, then timber (particularly) is prone to distortion.

Moisture invariably gets trapped between the sill (the very base of the window) and the bottom of the sash and quietly rots away whilst the unwary occupant basks in sub tropical heat.  Add to this scenario the successive layers of paint applied to the interior more than the exterior and you begin to understand the dilemma.  One recent owner was perplexed about his rotting Bathroom window, “...after all John, we never, ever open it so why is there a problem?”

Traditional Weighted Sash windows

The moving, timber framed, glazed sash immerged in the early seventeenth century and is generally attributed to the French.  It was the English however who perfected the counter balance mechanism that allows the vertical sliding sash to be self-supporting when moved and this weight-balanced system dates from around 1680.  The rope sash window typically seen in Victorian and Edwardian houses is essentially unchanged from the seventeenth century design and almost 350 years of regular use must surely say something about reliability.

Replacing the broken or worn sash ropes is one of my most rewarding maintenance jobs as it gives the resident a functioning window and in all probability a repair that lasts for decades.  If you have broken or frayed ropes it is relatively simple to have them replaced but please do so before you paint the windows as access to concealed weights does require removal of some of the timber trims (not as frightening as you imagine).

I was once directed by an estate agent to cut off the broken cords of a  sash window and nail it shut.  Incredulous at his barbarism you can imagine my answer.

As indicated, a window regularly used will avoid rot but if it exists and continues unchecked a wooden sash or sill will become severely damaged.  This process of damage is not quick and is the result of years of neglect and indifference.  When a sash itself is weakened by rot, the joinery naturally loosens, making the glass precarious.  The simplest solution is to replace the whole sash frame itself with a salvaged one of the same size.  If a replacement cannot be readily found another option is to partially remake the frame, replacing damaged timbers (usually the base) with new sound timbers.  Once painted the replacement lengths are virtually undetectable.  The downside here is time, for the offending sash must be left with the joiner (usually a week) leaving the occupant with a missing windowpane. 

So to avoid all this you need to go right now and open those windows you’ve been neglecting.  What’s that?  You can’t open them? Nailed shut? Rotting? Broken cords?

Relax, it’s ok you can give me a call.  Just don’t ask me to nail them shut.


Sad yet extremely common examples of neglect.  Obviously these window frames and sashes are beyond repair and will need to be replaced.  An easily avoided expense.

A severely damaged sill from a 1902 Edwardian house,  caught at this point irrepairable damage can still be avoided.

Another window from the same premises.  Note earlier attempts to replace rot in the sash frame with epoxy filler.  A full sash replacement is the only solution for this problem.

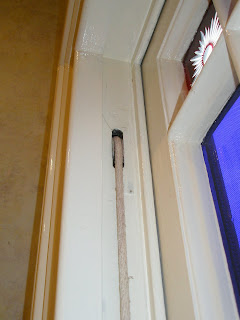
Detail of a well maintained Victorian window showing the rope and traditional pulley mechanism.

A variation on the rope system is the less efficient spiral/sprung lifting sash which appeared in large numbers following the Second World War.  The spiral sash mechanism does not require weights and holds the window in tension via conduit covered twisted springs.  Ironically the spiral sash is more time consuming to repair as replacement sized spiral springs often need to be ordered.

Monday, 2 May 2011

Working with Paint

It would be interesting to know just how many litres of paint I have used over the years.  Although not a trade painter I’ve undertaken many interior and exterior makeovers and regularly work with both water and oil based paints.  The last few days have found me adding to this experience in the lofty heights of a Melbourne CBD apartment block applying swaths of designer whites.

In addition to complete repaints I am regularly asked to freshen uptired or grimy finishes for impending rentals or sales or to “just paint over the offending marks.”  I hear this so often that I feel some written advice may be helpful for those who find these requests perfectly sound and simple.

The tidy up of marked walls is never routine for the original paint is rarely available and even then can be a different product inside the tin from that on the walls or woodwork.  Exposed to general wear and tear and extremes of temperature, paint changes.  For this reason even a diligently kept tin of the original paint (a rare occurrence) can sometimes give disappointing results when applied over itself.

To be successful the ‘quick’ paint-over must be done to the whole wall and not merely part of it.  Yes, I realize that may be obvious to many but I sometimes struggle to get the logic of the idea across.  Even if the re-touch colours match, it is far better for the surface to have a complete uniform coating rather than one with isolated patches that show up in the ever-changing light.

Sometimes the only option for a decorator intent on the original colour is to request a paint match and I use this term in the general sense for really no two colours are ever the same.  In spite of advances in modern technology a colour- matching computer can only do so much and the required colour will need to be fine tuned by the paint shop staff.  Achieving the right colour and sheen level is really an exacting skill so please be patient with your paint person, give them the respect their efforts deserve and please don’t be in a hurry.

For these reasons your choice of supplier is crucial.  I generally steer away from individual recommendations but I will suggest you choose a store that deals solely in paint.  Yes, I have had successful results from my local hardware stores but really if you are matching paint get assistance from those who specialize.  A question I am often asked is which paint brand I prefer.  Obviously I prefer quality to quantity but really I have had good results from all of the known brands and even those under the radar.  Generally though there is a reason behind the higher price and good ingredients are worth it.  The point with painting is preparation and taking care with colour, finish and application.  It sounds obvious but there is no point buying the most expensive paint if you use cheap rollers and brushes and rush the job.

Obtaining the correct colour is one thing; the next stage is the finish or sheen level such as matt, low sheen, satin, semi-gloss, etc.  Sheen level is crucial to successful matching but this is often overlooked in the desire for colour perfection.  A freshly painted low sheen finish will generally be shinier that that of an existing, earlier example of the same brand.  Consider this point, as sheen level drops with age and cleaning.  With exterior paint for instance, a full gloss finish will diminish rapidly with the weather and can appear dull after a matter of months.  If you were intent on matching the finish in this situation, then the sheen level would be dropped to perhaps a semi-gloss to avoid the obvious higher shine ‘retouched’ look.

You need a good sample when colour matching.  At a pinch a small coin-sized sliver may be enough but really you need something much larger.  The computer lens requires only a tiny sample area but you need the extra size for the potential matches.  Possible matches are painted directly onto your original paint samples and dried (often by a hairdryer) to gauge the match.  Often three or four attempts are needed to get the desired result, hence the need for large or multiple samples.  Why the drying?  When wet, paint reflects more light giving the impression of a lighter colour.  Paint therefore dries darker and needs to be dry for the colour to be assessed.

Getting samples of the required colour is usually a problem.  I have seen feeble attempts to scrap paint flakes from walls and woodwork with pathetic results.  Good samples require you to be a little daring and adventurous.  If the colour were on wood, say, a skirting or architrave then I would consider removing a small length and reattaching it later.  Trust me it’s common to see painters in shops with a length of timber under their arm, as sometimes it’s the only way.  Walls made of plasterboard are easier to sample as a rectangle of colour can be carefully cut from either inside a cupboard or behind a door or fridge etc.  You simply need to cut through the paper covering the inner plaster and peel this off.  The exposed white plaster can be filled and then sanded when dry.  If you are repainting then any small areas damaged by sampling should be invisible after decorating.

Then again you could simply choose an entire new colour scheme, oh... and speaking of designer whites.

An advertisement taken from the August 1966 edition of ‘The Practical Householder’ magazine (UK).